Description
Relay is
Relay is an electrical switch that is controlled by an electrical signal. It is used for:
Control high voltage electrical devices (e.g. fans, 220V bulbs) with electrical signals from Arduino (5V).
This allows the Arduino to safely control high-current devices (since the Arduino cannot directly supply high current).
Relay Module is available in various types such as 1 Channel, 2 Channel, 4 Channel depending on the number of devices to be controlled.
Specifications of Relay 5V Module
|
list
|
details
|
|
Control pressure (Input)
|
5V DC (from Arduino)
|
|
Load voltage (Output)
|
Up to ~250V AC or 30V DC
|
|
Maximum load current
|
10A
|
|
Number of channels (Channel)
|
1, 2, 4 (select according to the number of devices to be controlled)
|
|
Logic Control
|
Active LOW (some models)
|
|
There is an optocoupler.
|
Some models have a circuit breaker to isolate the electrical circuit (safer).
|
|
Output legs (3 legs)
|
NO (Normally Open), NC (Normally Closed), COM (Common)
|
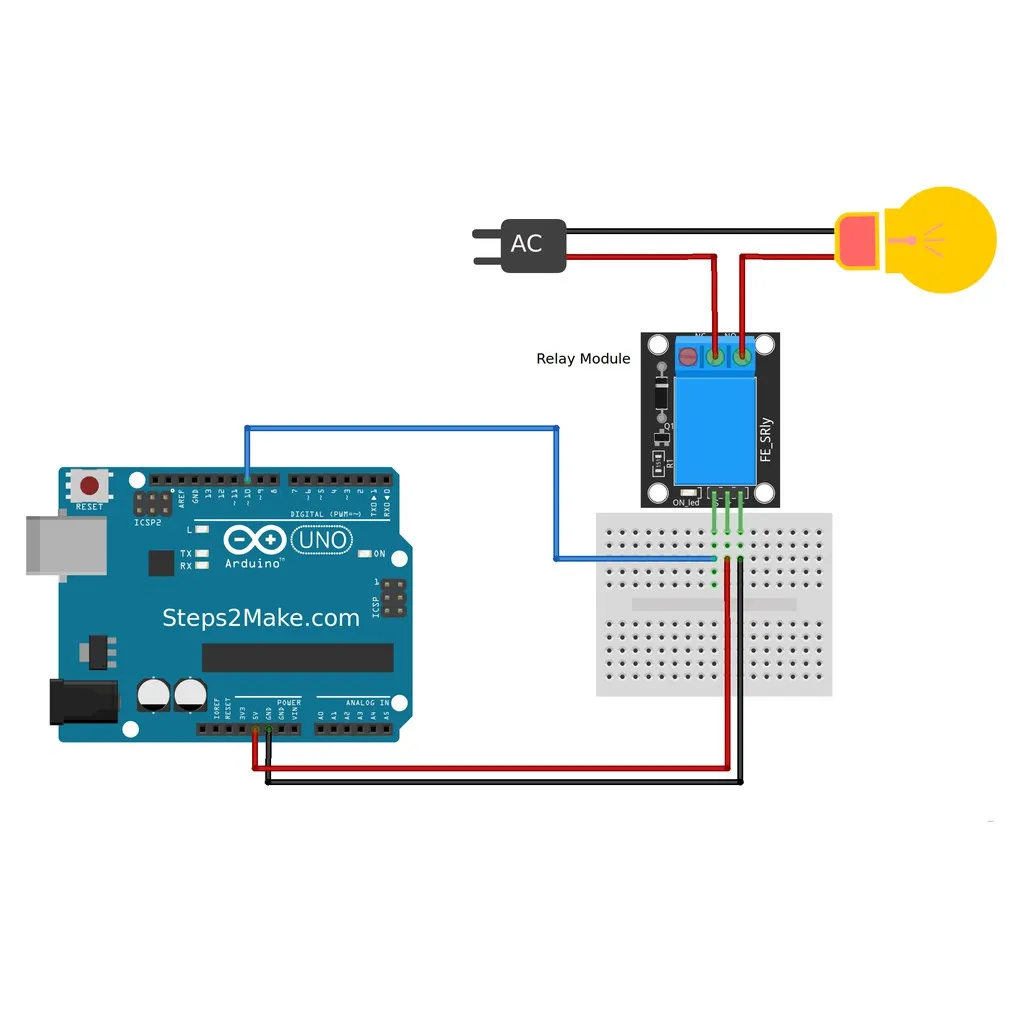
Using Relay with Arduino
Wiring (Example 1 Channel):
|
Relay Pin
|
Arduino Pin
|
|
VCC
|
5V
|
|
GND
|
GND
|
|
IN1
|
D7 (or as required)
|
The IN1 leg is used to turn the relay on/off.
If it is 2/4 Channel, there will be IN2, IN3, IN4 added.
Example of connecting electrical equipment to a house:
Warning: You should have knowledge of 220V electricity and be very careful.
Use an extension cord or an electrician if you are not sure.
Connection:
COM → Connect to AC power (input line)
NO → Connect to the device you want to turn on/off (light, fan).
When Arduino sends a signal → Relay closes the circuit → Power goes to the device.
Code example:
int relayPin = 7;
void setup() { pinMode(relayPin, OUTPUT); }
void loop() {
digitalWrite(relayPin, LOW); // Open relay (some models LOW means open)
delay(3000); // leave open for 3 seconds
digitalWrite(relayPin, HIGH); // close relay
delay(3000); // wait another 3 seconds }
If your relay is Active HIGH, switch LOW and HIGH.
What can it be used with?